How to Make a Video Wall: Your Must-Read Guide 2023

From smartphones to tablets and everything in between, technology keeps changing the rules of the game. The smartest companies rapidly respond, finding cutting-edge ways to target customers. For example, texts have become a vital part of marketing for many companies in recent years.
So, what’s the latest and greatest innovation headed your way? The video wall.
Until recently, these walls were considered rarities. Only high-end retailers and large corporations could afford them.
After all, the price tags for such elaborate displays ascended into the stratosphere. We’re talking six figures or more! But times have changed. Advances in technology, coupled with a vast increase in supply, mean more affordability and access than ever before.
Nevertheless, preparing and setting up video walls isn’t without its complications. It also proves time-consuming.
Keep reading for how to create an LCD wall. From installation tips to answers to your most time-consuming and hard-to-manage issues, here’s what you must know.

Setting Up a Video Wall Display
There are countless reasons why companies want video walls, and the price is one of the dominating factors. As digital signage continues to become more affordable, expect the playing field to a level even more.
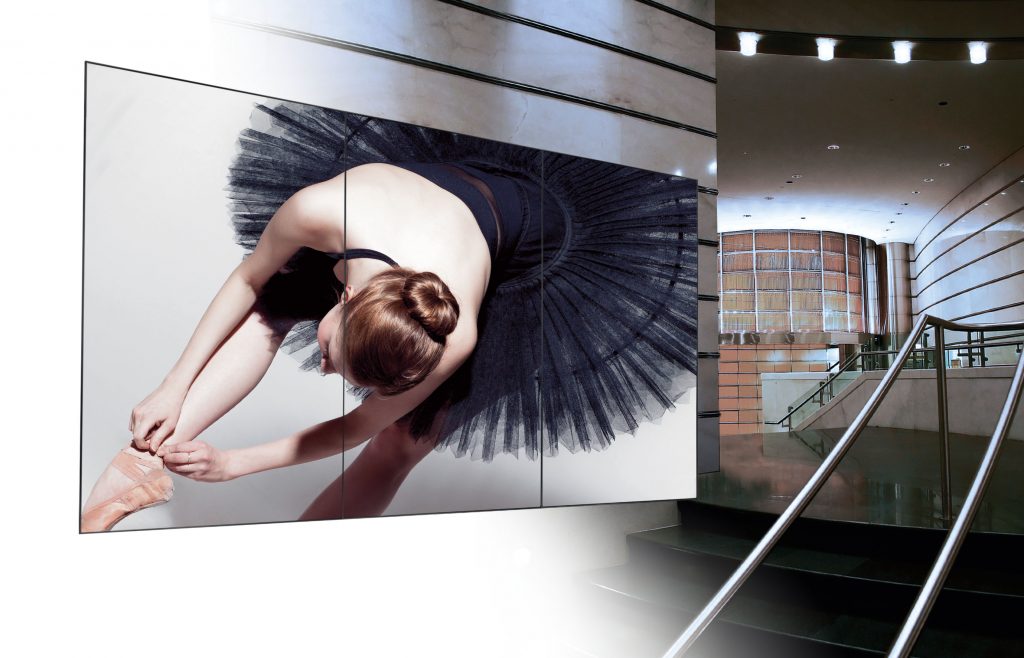
Video walls have also become more attractive and eye-catching due to advances in resolution. Bezels, the frames surrounding each screen, also continue to shrink, making video walls look more fluid and pleasing. You’re likely excited to install your video wall display for the reasons above.
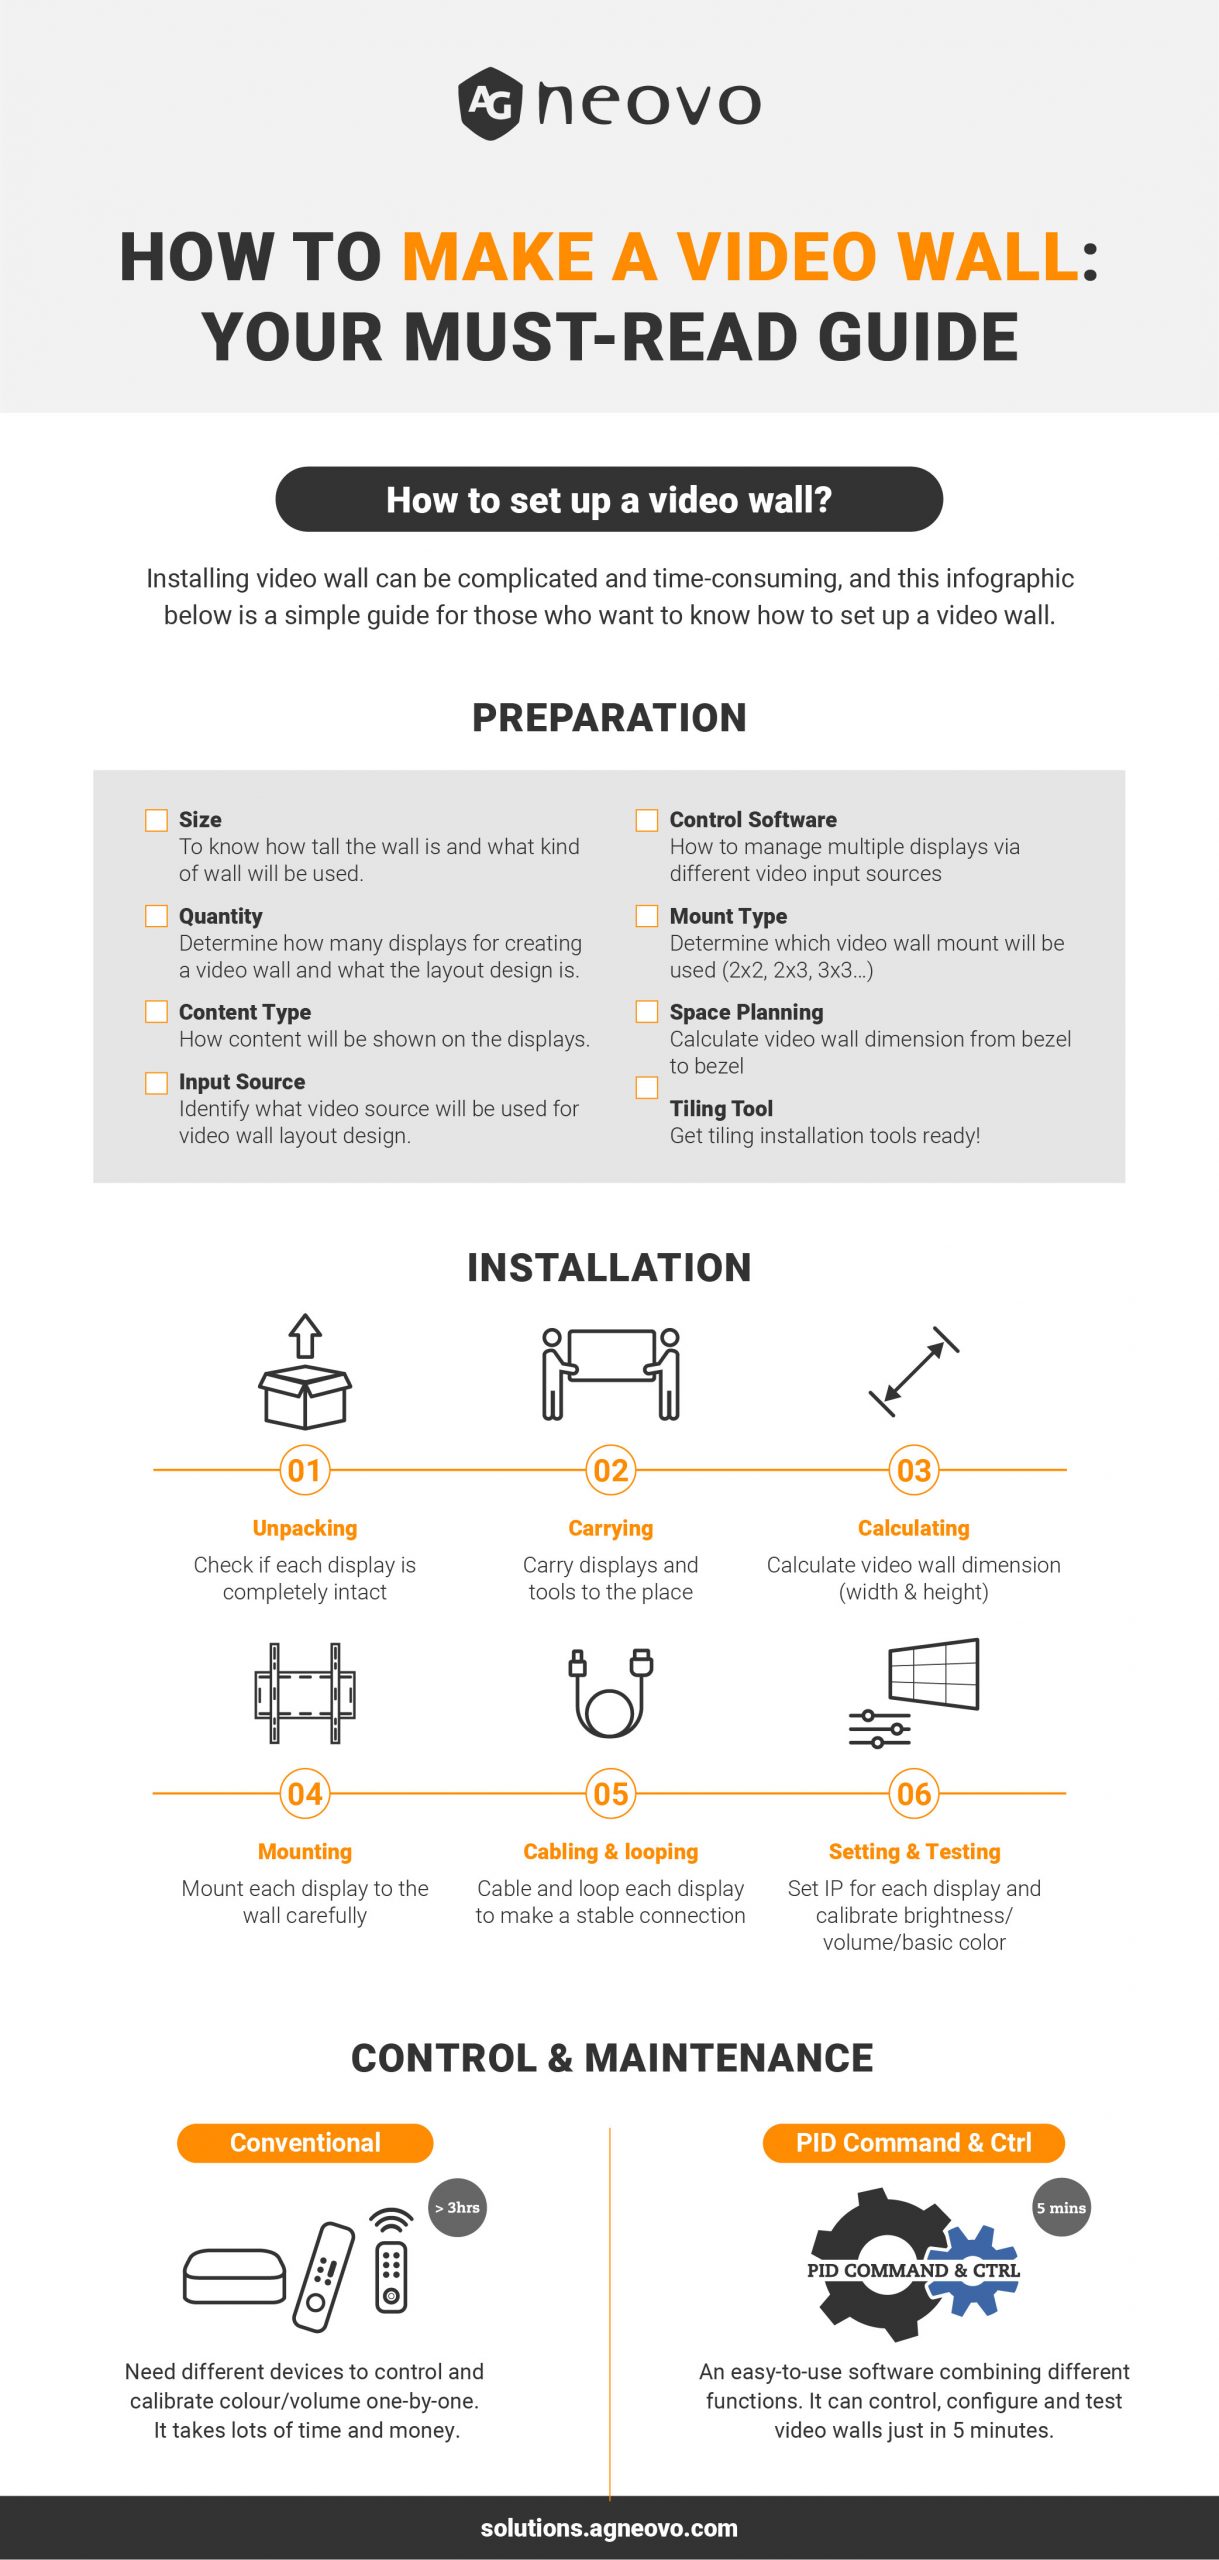
What does the process look like? Before any installation can occur, you’ll need to make decisions about the following:
- The desired size of the panels
- The number of displays you want
- The view type you prefer
- The input source
- The control software you desire
- The mount types you’ll use
As you can see, you’ll need to make concrete plans before installation. For optimal success, strive to set clearly defined and measurable objectives. That way, you’ll recognize success when you’ve achieved it and save lots of money, too!
The Desired Size of the Panels
Once you’ve decided where you’d like your video wall to go, you need to develop a concrete plan for how you’ll realize it. One common mistake we see during such installations is the failure to account for unexpected dimensions.
What do we mean by “unexpected dimensions?” For starters, the actual size of the display is generally different from that market with the product. Remember that companies list screen sizes diagonally, and don’t forget about the bezels that frame the screens.
Second, you’ll want to make sure that you factor in the frame and supporting structure’s dimensions. Otherwise, your setup could get dramatically thrown off before you know it.
Remember that you’ll also need to add the amount of room required behind the support structure and displays. The same goes for the optimal distance between displays (when you’re using multiple screens).
Besides these factors, consider practical things such as the distance from the video wall to internet connections and power. Lastly, ensure the room is adequately equipped with computers, WiFi, media players, and anything else your video wall requires for operation.
The Number of Displays You Want
Before you can determine how many displays you’d like to install on your wall, you must know just how much room you have for your display.
Measure the wall upon which the installation will go carefully. Most office walls come in around 8.5 feet high, but that doesn’t mean you can slack on taking measurements. After all, anomalies happen. Measure the width to know exactly how much space you’ll have to work.
Once you’ve got some dimensions, determine the type of wall you’re dealing with, either resilient channel (RC) or wooden. You’ll also want to consider how much weight you’ll be mounting on the wall. Once you’ve ensured everything’s on the up and up with the walls, it’s time to start fleshing out visual plans.
Grab a sheet of paper and sketch out the wall and the space available for screens. Make sure the drawing is to scale so that you can plot out what goes where.
You can explore certain esthetic principles, such as margins, by sketching the space. Margins play a significant role in video wall esthetics. So, don’t leave them to chance.
What choices do you have when it comes to layout design? Layouts range from simple 2×2 and 2×3 designs to artistic video walls.
The Type of View You Prefer
You’ve got many choices to make when it comes to what your video wall will look like once completed. For one, you’ll have to select the type of technology you wish to use. Types of technology currently available include:
- Direct view LED arrays
- LCD panels
- Blended projection screens
- Laser phosphor displays
- Rear projection cubes
When viewing videos on the wall, you’ll also need to make the call between going with a uni-view or a separate view.
The Input Source
Next, decide on which connectivity to use for your content distribution.
For example, will you opt for DP, HDMI, or IR/RS232 daisy chain loop to connect to a PC? Or a video wall controller such as Matrix to broadcast? Will you show a video, signage, or slideshow on your video wall?
You must have a player of some type. This player is typically a small computer that handles the broadcasting. Some individuals even use a desktop computer to control this broadcasting.
That said, your best option remains to use a media player. Why? Because, unlike a laptop, a media player is designed specifically for this purpose.
That means they tend to be compact and constructed to specifications solely for the purpose of displaying video on a big display.
Players also make installation a cinch.
How? They can be attached to the backside of the display with double-sided velcro. It doesn’t get much easier than that.
Of course, if this option isn’t available, mount your media player in the ceiling or inside a cabinet, if possible. We recommend buying cable concealers to avoid a messy and cluttered space.
Not only will these handy items keep your cords sorted nicely and neatly, but they’ll also prevent you from having a fall hazard in your workspace. You can find these devices in most wall paint colors, providing esthetic unity for your business.
The Control Software You Prefer
After you’ve decided which broadcasting device you want to use for your video wall, install the appropriate software on your device. That way, you can run slideshows, videos, and other media. There are a variety of video wall solutions out there today.
These management systems are intuitive and easy to use. You’ll feel shocked at how easy it is to broadcast to video walls, signage, and slideshows.
For example, AG Neovo is a one-stop-shop for your video wall solution needs, offering public information display management software, PID Command & Ctrl, that is possible to use the wholly simple and intuitive interface to run all kinds of campaigns while on the go. If you’re running large-scale display deployment, this software is capable of saving you a significant amount of time – no matter when or where you’re setting up or managing your digital signage solutions.
Look for a software solution that saves your company both time and money. This approach will free you and your employees up to invest your energy and finances in other vital areas of your business.
The Mount Types You’ll Use
At this point, you should have a thorough concept of your video wall’s overall dimensions. Believe us, you don’t want any surprises after the screens have been delivered! You’ll need to find the right combination of mounts, hardware, and displays to realise your plan.
There are different types of video wall mounts. You must buy the ones that create the right layout for your projected design (e.g., 2×2, 2×3, 3×3, etc).
Most mounting frames are capable of holding a range of display sizes. But make sure you take accurate notes about the values you decide upon so that you select the best displays for your setup plan.
Next, get out your measuring tape and start checking measurements. As we’ve already mentioned, it’s important that your measurements accurately account for display and frame dimensions. This precaution will help ensure you get your video grid the way you want.
Go back to the sketches that you made and add in equipment dimensions. (You may need to draw a new sketch to accommodate everything.)
That way, you’ll better understand how the wall mounts and displays will interact. For example, they typically have feet if you opt to go with video grids. Nevertheless, consider mounting them to the wall for added safety.
After you acquire the right tools for the job (hello, laser level!), it’s time to install your wall.
Tips for Installation
When it comes to installing your video wall panels, here are some handy tips to bear in mind. Start by unpacking the displays one by one. As you do this, check to make sure each display is wholly intact and damage-free. We suggest making a video of the process as a safeguard.
Once you’ve carefully unpacked everything, you’ll want to move the displays and all your tools to the installation space. Double-check your video wall dimensions (e.g., width and height) and carefully mount each display to the wall.
As you prepare to install the screens, they can feel both exciting and make or break. You’ll need an extra hand or two. So, recruit members of your team for assistance.
Set up each display from the left bottom, row by row, or from the central row by row. Finally, make sure that cable and loop display panels have a stable connection based on your video source of choice (e.g., IR/RS232, DVI, DP, LAN, or HDMI).
Setting Up the Display
What do you do after you’ve mounted the displays on the wall? Next, it’s time to set up the displays.
Where to start? Remember to set IP addresses for each of your displays. Next, set a label for each panel to distinguish which panel will be deployed in the right position.
After that, it’s time to work on the calibration of your video wall. What do we mean by calibration? We’re referring to how you wish to adjust the following characteristics:
- Brightness
- Volume
- Basic color calibration
The most critical calibration parameters for monitors and displays are brightness and color. So, you’ll need to adjust both the primary colors and the light output of the screens. Since monitors typically get calibrated in the factory, they should have a pleasing appearance after installation.
Small changes in brightness and color will occur over time, requiring future adjustments. While this might not be obvious on a video wall with a single screen, it’ll present a glaring problem for screens installed right next to one another.
Even the slightest nuances in brightness and color could end up driving your eyes crazy. Such irregularities threaten to downplay the impact of your wall, which is the last thing you want. In other words, your video wall will appear out of balance without perfect calibration.
Control and Maintenance
This calibration will need to get handled manually multiple times per year. An expensive and time-consuming process, it also requires downtime. In recent years, significant advances have been made in terms of real-time calibration and continuous real-time calibration.
These are worth further exploration for those who want to ensure their video wall always looks in tip-top shape. These matrices or video wall controllers will automatically calibrate the screen images, color temperature, and brightness of your video wall’s pictures.
They’ll also monitor how image performance gets seen. That way, you’ll have the final product you’ve always imagined. Traditionally, you needed different devices to control and calibrate colors and volume on each display.
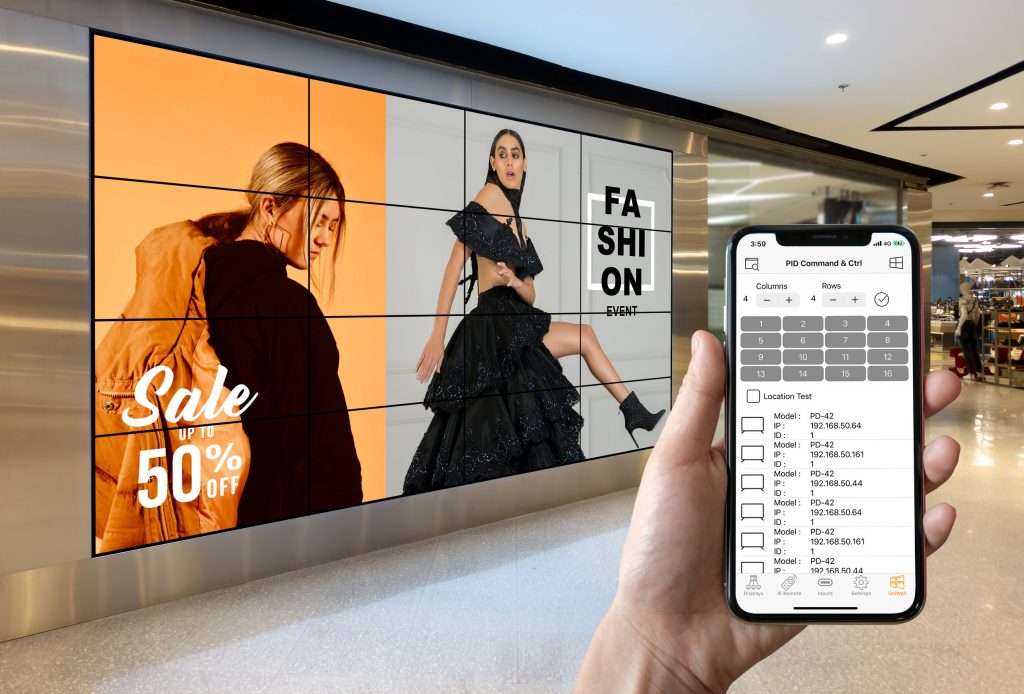
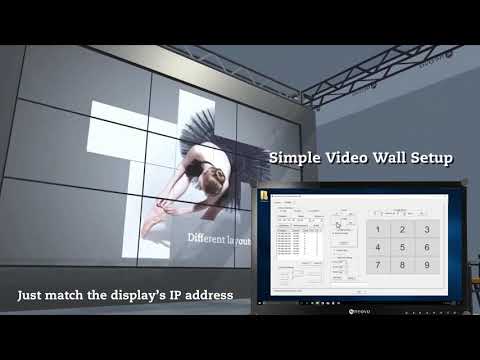
But now, display management software such as AG Neovo’s PID Command & Ctrl will streamline your process. PID Command & Ctrl is an easy-to-use software that combines different functions and allows users to control, configure, and test video walls in five minutes. It also helps you quickly find command codes for external control system integration.
It has a simple and intuitive interface for video wall remote management. PID Command & Ctrl is also easy to connect through Lan or RS232, providing stunning results every time.
It provides unprecedented levels of control when configuring multiple AG Neovo public information displays for digital signage solutions or RS232 and LAN-connected LCD video wall solutions.
Which equipment is PID Command & Ctrl compatible with? Besides a Windows version, PID also has iOS and Android versions. These versions enable you to control your video wall with the simple touch of your mobile phone. It doesn’t get any easier or more convenient than that.
PID Command & Ctrl makes maintaining large-scale digital signage installations more convenient and intuitive than ever before. And if a problem arises? It lets you quickly diagnose connection and configuration problems, minimizing the downtime needed to remedy your video wall issues.
There’s no better software management tool if you’re running a large-scale display deployment. This software will save you plenty of money and countless hours. It’ll also make your dream of having a magnificent-looking video wall possible because you’ll have the necessary resources to achieve it.
How to Make a Video Wall That’s Effective and Affordable
As you can see, LCD video wall installation is no simple task. But having an LCD wall at your business comes with endless benefits. With the right know-how and software system support, you can take full advantage of a video wall’s many benefits while enjoying the peace of mind that comes from being able to manage it from anywhere.
Besides making an impression when customers walk through the doors of your business, a video wall serves many other purposes. It gives your executives, team, and other stakeholders the data they need to be displayed on KPI dashboards.
As a result, it enhances collaboration while ensuring everyone’s on the same page. If you prefer to dedicate your video wall to customers, use it to greet them and ramp up the “wow” factor. It’s also a helpful place to display live TV broadcasts, news, weather, live sports, and more.
Innovative products such as AG Neovo PID Command & Ctrl make video walls affordable and user-friendly. Contact us to bring your company’s video display dreams to life. Click here to learn more about AG Neovo video wall displays.
PID Command & Ctrl Tutorial

Infographic
How to Make a Video Wall: Your Must-Read Guide
2 thoughts on "How to Make a Video Wall: Your Must-Read Guide 2023"
Comments are closed.
Can it be deployed in cct surveilance with multiple NVR and video management software
Hi Robert,
PID Command & Ctrl can control AG Neovo displays remotely. Supports Windows, iOS and Android.
You can find download links from here.
https://solutions.agneovo.com/technical-support/download/
Many thanks.